

Pipelines, Pipelines, Pipelines! An excerpt from Continuous Delivery for Kubernetes by Mauricio Salatino This excerpt is focused on using Pipelines to build solutions that can be copied, shared and executed multiple times to produce the same results.
Read it if you’re a developer interested in pipelines.
Get 35% off all books, including Continuous Delivery for Kubernetes by entering blcdfond22 into the discount code box at checkout at manning.com.
We’re so happy that our community member Mauricio Salatino @salaboy, wrote this book! Here’s an excerpt for you.
Pipelines
Pipelines can be created for different purposes and it is quite common to define them as a set of steps (one after the other in sequence) that produce a set of expected outputs. Based on these outputs, these pipelines can be classified into different groups.
Most pipeline tools out there allow you to define pipelines as a collection of tasks (also known as steps or jobs) that will run a specific job or script to perform a concrete action. These steps can be anything, from running tests, copying code from one place to another, deploying software, provisioning virtual machines, etc.
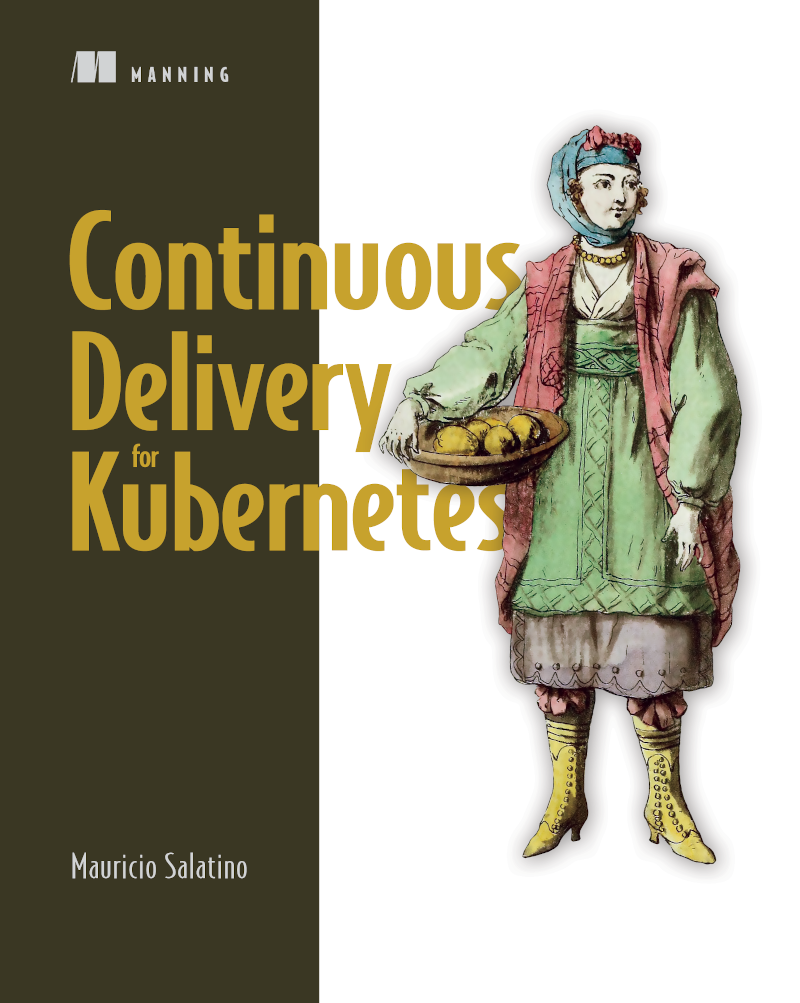
Pipeline definitions can be executed by a component known as the Pipeline Engine, which is in charge of picking up the pipeline definition to create a new pipeline instance that runs each task. The tasks will be executed one after the other in sequence, and each task execution might generate data that can be shared with the following task. If there is an error in any of the steps involved with the pipeline, the pipeline stops and the pipeline state will be marked as in error (failed). If there are no errors, the pipeline execution (also known as pipeline instance) can be marked as successful. Depending on the pipeline definition and if the execution was successful, we should verify that the expected outputs were generated or produced.
In Figure 1, we can see the Pipeline engine picking up our Pipeline definition and creating different instances that can be parameterized differently to have different outputs. For example, Pipeline Instance 1 finished correctly while Pipeline Instance 2 is failing to finish executing all the tasks included in the definition. Pipeline Instance 3 in this case is still running.
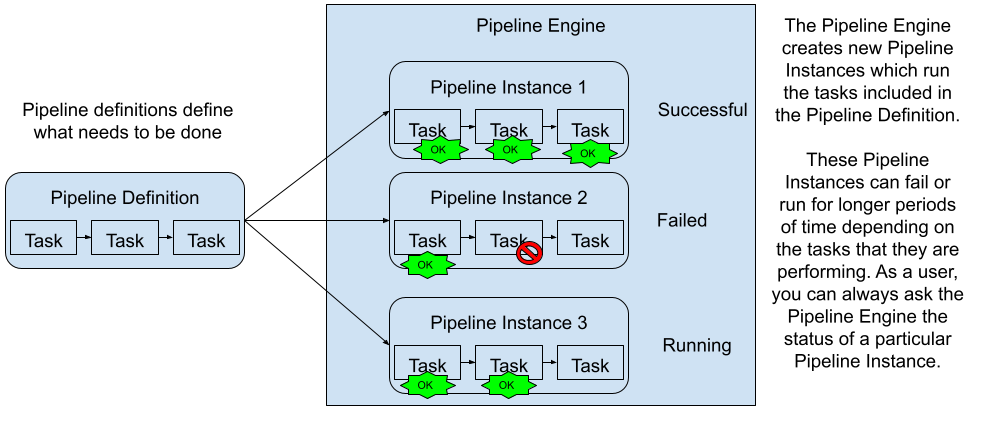
Figure 1: A Pipeline definition can be instantiated by a Pipeline Engine multiple times
As expected, with Pipeline definitions we can create loads of different automation solutions, but how do these concepts apply to delivering Cloud-Native applications? For Cloud-Native applications, we have very concrete expectations about how to build, package, release and publish our software components (Services) and where these should be deployed. In the context of delivering cloud-native applications we can define two main kinds of pipelines:
- Service Pipelines: will take care of the building, unit testing, packaging and distributing (usually to an artifact repository) our software artifacts
- Environment Pipelines: will take care of deploying and updating all the services in a given environment such as staging, testing, production, etc.
Service and Environment Pipelines are executed on top of different resources and with different expectations. The following sections go into more detail about the steps that we will need to define for our service and environment pipelines, as these steps will be similar no matter which technology stack we are using. Let’s take a look at the archetype of a Service Pipeline definition.
Service Pipelines
A Service pipeline is in charge of defining and executing all the steps required to build, package and distribute a service artifact so it can be deployed into an environment. A Service Pipeline is not responsible for deploying the newly created service artifact, but it can be responsible for notifying interested parties that there is a new version available for the service.
If you standardize how your services need to be built, packaged, and released, you can share the same pipeline definition for different services. You should try to avoid pushing each of your teams to define a completely different pipeline for each service, as they will be probably reinventing something that has been already defined, tested and improved by other teams.
As we will see in this section, there is a considerable amount of tasks that need to be performed and a set of conventions that when followed can reduce the amount of time required to perform these tasks.
The name “Service Pipeline” makes reference to the fact that each of our application services will have a pipeline that describes the tasks required for that particular service. If the services are similar and they are using a similar technology stack, it makes sense for the pipelines to look quite similar. One of the main objectives of these Service Pipelines is to contain enough detail so they can be run without any human intervention, automating all the tasks included in the pipeline end to end.
Note: it is tempting to think about creating a single pipeline for the entire application (collection of services), as we did with Monolith applications, but that defeats the purpose of independently updating each service at its own pace. You should avoid situations where you have a single pipeline defined for a set of services, as it will block your ability to release services independently.
Conventions will save you time
Service Pipelines can be more opinionated on how they are structured and what their reach is, by following some of these strong opinions and conventions you can avoid pushing your teams to define every little detail and discover these conventions by trial and error. The following approaches have been proven to work:
- Trunk Based Development: the idea here is to make sure that what you have in the main branch of your source code repository is always ready to be released. You don’t merge changes that break the build and release process of this branch. You only merge if the changes that you are merging are ready to be released. This approach also includes using feature branches, which allow developers to work on features without breaking the main branch. When the features are done and tested, developers can send Pull Requests (Change requests) for other developers to review and merge. This also means that when you merge something to the main branch, you can automatically create a new release of your service (and all the related artifacts). This creates a continuous stream of releases which is generated after each new feature is merged into the main branch. Because each release is consistent and has been tested you can then deploy this new release to an environment that contains all the other services of your application. This approach enables the team behind the Service to move forward and keep releasing without worrying about other services.
- One Service/One Repository/One Pipeline: you keep your service source code and all the configurations that need to be built, packaged, released and deployed into the same repository. This allows the team behind the service to push changes at any pace they want, without worrying about other services’ source code. It is a common practice to have the source code in the same repository where you have the Dockerfile describing how the docker image should be created as well as the Kubernetes manifest required to deploy the service into a Kubernetes cluster. These configurations should include the pipeline definition that will be used to build and package your service.
- Consumer-Driven Contract Testing: Your service uses contracts to run tests against other services, unit testing an individual service shouldn’t require having other services up and running. By creating Consumer-driven contracts each service can test its own functionality against other services APIs. If any of the downstream services is released a new contract is shared with all the upstream services so they can run their tests against the new version. Chapter XX will cover Consumer-Driven Contract testing in more detail.
If we take these practices and conventions into account, we can define the responsibility of a Service Pipeline as follows: “Transform source code to an artifact that can be deployed in an environment”.
Service pipeline structure
With this definition in mind, let’s take a look at what tasks are included in Service Pipelines for Cloud-Native applications that will run on Kubernetes:
- Register to receive notifications about changes in the source code repository main branch: (source version control system, nowadays a Git repository): if the source code changes, we need to create a new release. We create a new release by triggering the Service Pipeline.
- Clone the source code from the repository: to build the service, we need to clone the source code into a machine that has the tools to build/compile the source code into a binary format that can be executed.
- Create a new tag for the new version to be released: based on trunk-based development, every time that a change happens a new release can be created. This will help us to understand what is being deployed and what changes were included in each new release.
- Build & Test the source code:
- As part of the build process, most projects will execute unit tests and break the build if there are any failures
- Depending on the technology stack that we are using, we will need to have a set of tools available for this step to happen, for example, compilers, dependencies, linters (static source code analyzers), etc.
- Publish the binary artifacts into an artifact repository: we need to make sure that these binaries are available for other systems to consume, including the next steps in the pipeline. This step involves copying the binary artifact to a different location over the network. This artifact will share the same version that the tag that was created in the repository, providing us with traceability from the binary to the source code that was used to produce it.
- Building a container: if we are building Cloud-Native services, we will need to build a container image. The most common way of doing this today is using Docker. This step requires the source code repository to have, for example, a Dockerfile defining how this container image needs to be built.
- Publish the container into a container registry: in the same way that we published the binary artifacts that were generated when building our service source code, we need to publish our container image into a centralized location where it can be accessed by others. This container image will have the same version as the tag that was created in the repository and the binary that was published. This helps us to clearly see which source code will run when you run the container image.
- Lint, verify and package YAML files for Kubernetes Deployments (Helm can be used here): if you are running these containers inside Kubernetes, you need to manage, store and version Kubernetes manifest that define how the containers are going to be deployed into a Kubernetes cluster. If you are using a package manager such as Helm, you can version the package with the same version used for the binaries and the container image.
- (Optional) Publish these Kubernetes manifests to a centralized location: if you are using Helm, it makes sense to push these Helm packages (called charts) to a centralized location. This will allow other tools to fetch these charts so they can be deployed in any number of Kubernetes clusters.
- Notify interested parties about the new version of the service: if we are trying to automate all the way from source to a service running, the Service Pipeline should be able to send a notification to all the interested services who might be waiting for new versions to be deployed.
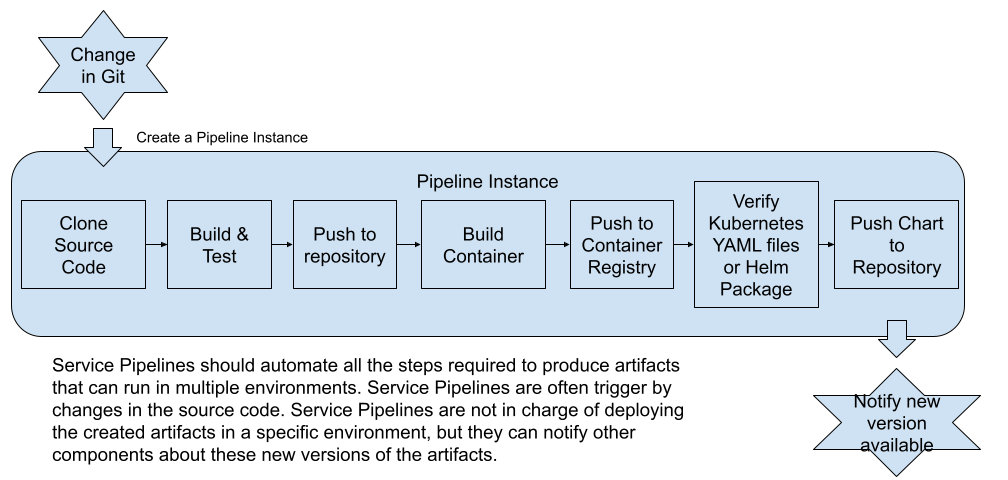
Figure 2: Tasks expected for a service pipeline
The outcome of this pipeline is a set of artifacts that can be deployed to an environment to have the service up and running. The service itself needs to be built and packaged in a way that is not dependent on any specific environment. The service can depend on other services to be present in the environment to work, for example, infrastructural components such as databases and message brokers, or just other downstream services.
Service Pipelines in real life
In real life, this pipeline will need to run every time that you merge changes to the main branch of your repository, this is how it should work if you follow a trunk-based development approach:
- When you merge changes to your main branch this pipeline should run creating a new release for your software. This means that you shouldn’t be merging code into your main branch if it is not releasable.
- For each of your feature branches, a very similar pipeline should run to verify that the changes in the branch can be built, tested and released. In modern environments, the concept of Github Pull Requests is used to run these pipelines, to make sure that before merging any “Pull Request” a pipeline validates the changes.
Figure 3: Service pipelines for main branch and feature branches
This Service Pipeline, shown in figure 3 represents the most common steps that you will need to execute every time you merge something to the main branch, but there are also some variations of this pipeline that you might need to run under different circumstances. Different events can kick off a pipeline execution, we can have slightly different pipelines for different purposes, such as:
- Validate a change in a feature branch: this pipeline can execute the same steps as the pipeline in the main branch, but the artifacts generated should include the branch name, maybe as a version or as part of the artifact name. Running a pipeline after every change might be too expensive and not needed all the time, so you might need to decide based on your needs.
- Validate a Pull Request/Change Request: The pipeline will validate that the Pull Request/Change Request changes are valid and that artifacts can be produced with the recent changes. Usually, the result of the pipeline can be notified back to the user in charge of merging the PR and also block the merging options if the pipeline is failing. This pipeline is used to validate that whatever is merged into the main branch is valid and can be released. Validating Pull Requests / Change Requests can be a good option to avoid running pipelines for every change in the feature branches, as when the developer(s) is ready to get feedback from the build system, can create a PR and that will trigger the pipeline. If developers made changes on top of the Pull Request, the pipeline would be retriggered.
Despite small differences and optimizations that can be added to these pipelines, the behavior and produced artifacts are mostly the same. These conventions and approaches rely on the pipelines executing enough tests to validate that the service that is being produced can be deployed to an environment.
Service Pipelines requirements
This section covers the infrastructural requirements for service pipelines to work as well as the contents of the source repository required for the pipeline to do its work.
Let’s start with the infrastructural requirements that a service pipeline need to work:
- Webhooks for source code changes notifications: First of all, it needs to have access to register webhooks to the Git repository that has the source code of the service, so a pipeline instance can be created when a new change in merged into the main branch.
- Artifact Repository available and valid credentials to push the binary artifacts: once the source code is built we need to push the newly created artifact to and artifact repository where all artifacts are stored. This requires to have an artifact repository configured and the valid credentials to be able to push new artifacts to it.
- Docker Registry and Valid credentials to push new container images: in the same way as we need to push binary artifacts, we need to distribute our docker containers, so Kubernetes clusters can fetch the images when we want to provision a new instance of a service. Having a container registry available with valid credentials is needed to accomplish this step.
- Helm Chart Repository and Valid Credentials: Kubernetes manifest can be packaged and distributed as helm charts, if you are using Helm you will need to have a Helm Chart repository and valid credentials to be able to push these packages.
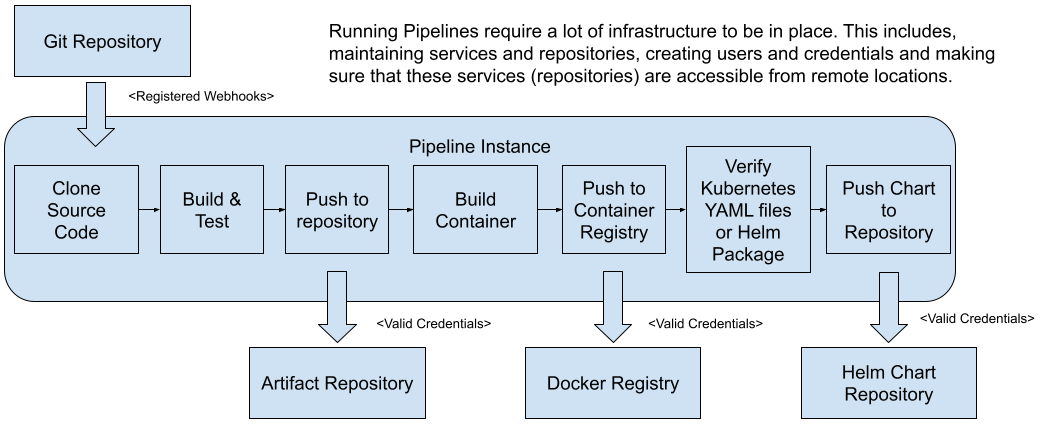
Figure 4: Service pipelines required infrastructure
For Service Pipelines to do their job, the repository containing the service’s source code also needs to have a Dockerfile or the ways to produce a container image and the necessary Kubernetes manifest to be able to deploy the service into Kubernetes. A common practice is to have a Helm chart definition of your service along with your service’s source code, in other words, a Helm Chart per Service, as we will see in the following sections.
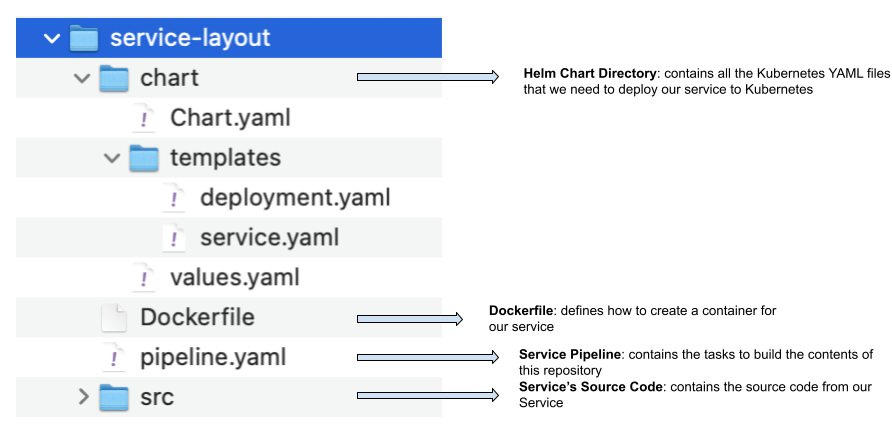
Figure 5: The Service source code repository needs to have all the configurations for the Service pipeline to work
Figure 5 shows a possible directory layout of our Service source code repository, which includes the source (src) directory which will contain all the files that will be compiled into binary format. The Dockerfile used to build our container image for the service and the Helm chart directory containing all the files to create a Helm chart that can be distributed to install the service into a Kubernetes Cluster.
If we include everything that is needed to build, package and run our service into a Kubernetes Cluster, the Service pipeline just needs to run after every change in the main branch to create a new release of the service.
A more advanced but very useful setup might include running the pipeline for Pull Requests (Change Requests) which can include deploying the artifact to a “Preview” environment where developers and other stakeholders can validate the changes before merging them to the main branch. Projects like Jenkins X provide this feature out-of-the-box.
In summary, Service Pipelines are in charge of building our source and related artifacts so they can be deployed into an environment. As mentioned before, Service Pipelines are not responsible for deploying the produced Service into a live environment that is the responsibility of the Environment Pipeline that is covered in the next section.
Environment Pipeline
Environment Pipelines are in charge of applying changes to our environments when new services or new versions of existing services are available. Environment Pipelines will run for specific configuration repositories which host the desired configuration for such an environment. A component then will monitor the changes in this repository and for each change apply/sync the desired state into a running Kubernetes Cluster. The whole approach is commonly known as GitOps, as it uses a Git repository as the source of truth for our environments and removes the need to manually interact with the Kubernetes clusters to avoid configuration and security issues.
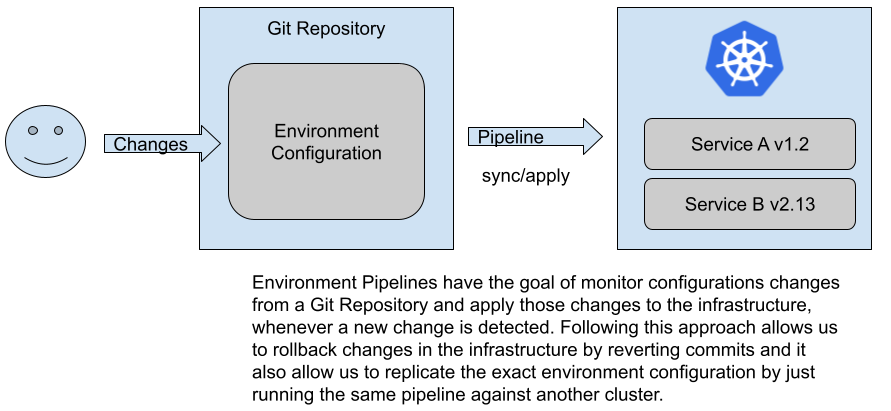
Figure 6: Defining the state of the cluster using configuration in Git (GitOps)
When you start using Environment Pipelines, you aim to stop interacting, changing or modifying the environment’s configuration manually and all interactions are done exclusively by these pipelines. To give a very concrete example, instead of executing `kubectl apply -f` or `helm install` into our Kubernetes Cluster, a pipeline will be in charge of running these commands based on the contents of a Git repository that has the definitions and configurations of what needs to be installed in the cluster.
Steps involved with an Environment Pipeline
An environment pipeline will usually include the following steps:
- Webhooks for configuration changes notifications: if there are any new changes into the repository which contains the configurations for the environment a new instance of the Environment Pipeline is triggered
- Clone the source code from the repository which contains the desired state for our environment: this step will clone the configurations that had changed to be able to apply them to the cluster. This usually includes doing a `kubectl apply -f` or a `helm install` command to install new versions of the artifacts. Notice that with both, kubectl or helm, Kubernetes is smart enough to recognize where the changes are and only apply the differences.
- Apply the desired state to a live environment: once the pipeline has all the configurations locally accessible it will use a set of credentials to apply these changes to a Kubernetes Cluster. Notice that we can fine-tune the access rights that the pipelines have to the cluster to make sure that they are not exploited from a security point of view. This also allows you to remove access from individual team members to the clusters where the services are deployed.
- Verify that the changes are applied and that the state is matching what is described inside the git repository: once the changes are applied to the live cluster, checking that the new versions of services are up and running is needed to identify if we need to revert back to a previous version. In the case that we need to revert back, it is quite simple as all the history is stored in git, applying the previous version is just looking at the previous commit in the repository.
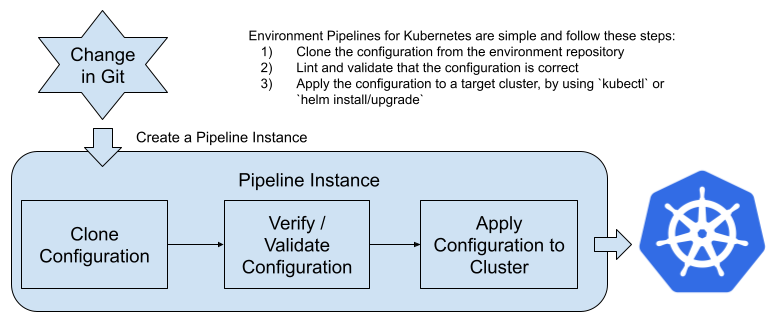
Figure 7: Environment pipeline for a Kubernetes environment
For the Environment Pipeline to work, a component that can apply the changes to the environment is needed and it needs to be configured accordingly with the right access credentials. The main idea behind this component is to make sure that nobody will change the environment configuration by manually interacting with the cluster. This component is the only one allowed to change the environment configuration, deploy new services, upgrade services versions or remove services from the environment.
For an Environment Pipeline to work, the following two considerations need to be met:
- The repository containing the desired state for the environment needs to have all the necessary configurations to create and configure the environment successfully.
- The Kubernetes Cluster where the environment will run needs to be configured with the correct credentials for allowing the state to be changed by the pipelines.
The term Environment Pipeline makes reference to the fact that each Environment will have a pipeline associated with it. As having multiple environments is usually required (development, staging, production) for delivering applications, each will have a pipeline in charge of deploying and upgrading the components that are running in them. By using this approach, promoting services between different environments is achieved by sending Pull Requests/Change Requests to the environment’s repository and the pipeline will take care of reflecting the changes into the target cluster.
Environment Pipeline requirements and different approaches
So what are the contents of these Environment’s repositories? In the Kubernetes world, an environment can be a namespace inside a Kubernetes cluster or a Kubernetes cluster itself. Let’s start with the most straightforward option, a “Kubernetes namespace”. As you will see in the figure that follows, the contents of the Environment Repository is just the definition of which services need to be present in the environment, the pipeline then can just apply these Kubernetes manifests to the target namespace.
The following figure shows 3 different approaches that you can use to apply configurations files to a Kubernetes Cluster. Notice that the three options all include an `environment-pipeline.yaml` file with the definition of the tasks that needs to be executed.
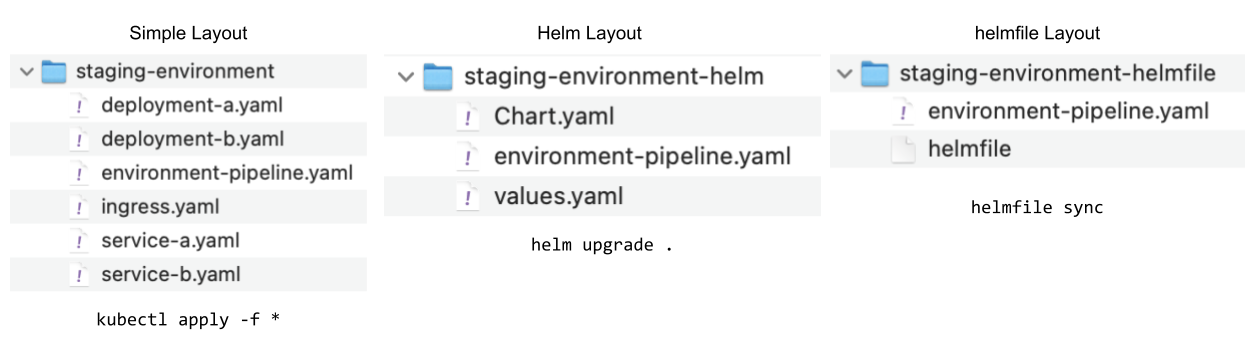
Figure 8: Three different approaches for defining environments’ configurations
The first option (Simple layout) is just to store all the Kubernetes YAML files into a Git repository and then the Environment Pipeline will just use `kubectl apply -f *` against the configured cluster. While this approach is simple, there is one big drawback, if you have your Kubernetes YAML files for each service in the service repository, then the environment repository will have these files duplicated and they can go out of sync. Imagine if you have several environments you will need to maintain all the copies in sync and it might become really challenging.
The second option (Helm layout) is a bit more elaborate, now we are using Helm to define the state of the cluster. You can use Helm dependencies to create a parent chart that will include as dependencies all the services that should be present in the environment. If you do so, the environment pipeline can use `helm update` to apply the chart into a cluster. Something that I don’t like about this approach is that you create one Helm release per change and there are no separate releases for each service. The prerequisite for this approach is to have every service package as a Helm chart available for the environment to fetch.
The third option is to use a project called `helmfile`(https://github.com/roboll/helmfile) which was designed for this very specific purpose, to define environment configurations. A `helmfile` allows you to declaratively define what Helm releases need to be present in our cluster. This Helm releases will be created when we run `helmfile sync` having defined a `helmfile` containing the helm releases that we want to have in the cluster.
No matter if you use any of these approaches or other tools to do this, the expectation is clear. You have a repository with the configuration (usually one repository per environment) and a pipeline will be in charge of pickup the configuration and using a tool to apply it to a cluster.
It is common to have several environments (staging, qa, production), even allowing teams to create their own environments on-demand for running tests or day to day development tasks.
If you use the “one environment per namespace” approach, it is common to have a separate git repository for each environment, as it helps to keep access to environments isolated and secure. This approach is simple, but it doesn’t provide enough isolation on the Kubernetes Cluster, as Kubernetes Namespaces were designed for logical partitioning of the cluster and in this case, the Staging Environment will be sharing with the Production environment the cluster resources.
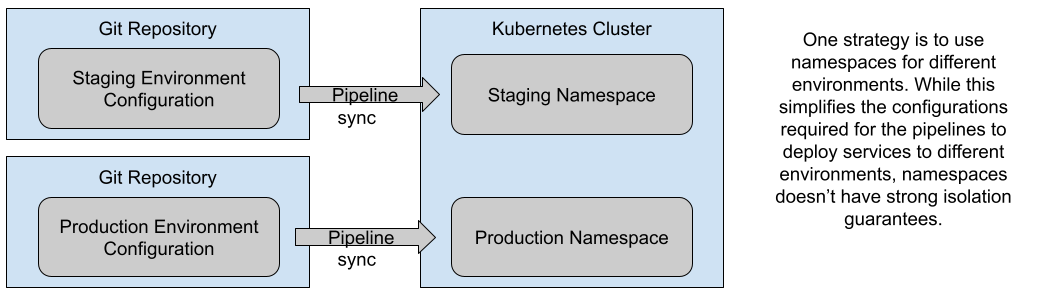
Figure 9: One Environment per Kubernetes Namespace
An alternative approach can be to use an entirely new cluster for each environment. The main difference is isolation and access control. By having a cluster per environment you can be more strict in defining who and which components can deploy and upgrade things in these environments and have different hardware configurations for each cluster, such as multi-region setups and other scalability concerns that might not make sense to have in your Staging and Testing environments. By using different clusters you can also aim for a multi cloud setup, where different environments can be hosted in different cloud providers.
Figure 10 shows how you can use the namespace approach for Development Environments which will be created by different teams and then having separated clusters for Staging and Production. The idea here is to have the Staging and Production cluster configured as similarly as possible, so applications deployed behave in a similar way.
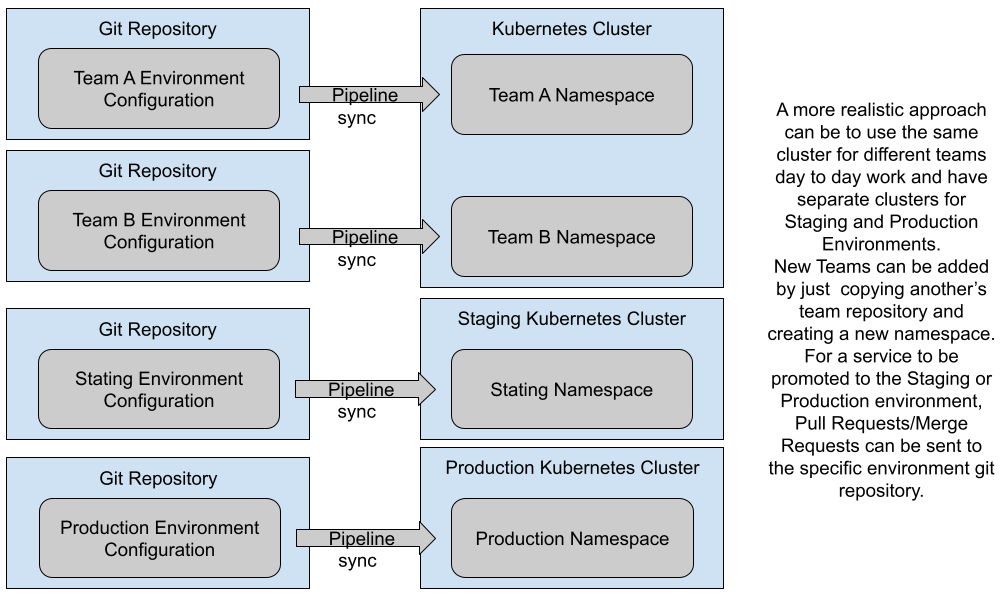
Figure 10: One Environment per Kubernetes Cluster
Service Pipelines + Environment Pipelines
Finally, let’s take a look at how Service Pipelines and Environment Pipeline connect. The connection between these two pipelines happens via Pull Request to repositories, as the pipelines will be triggered when changes are submitted and merged:
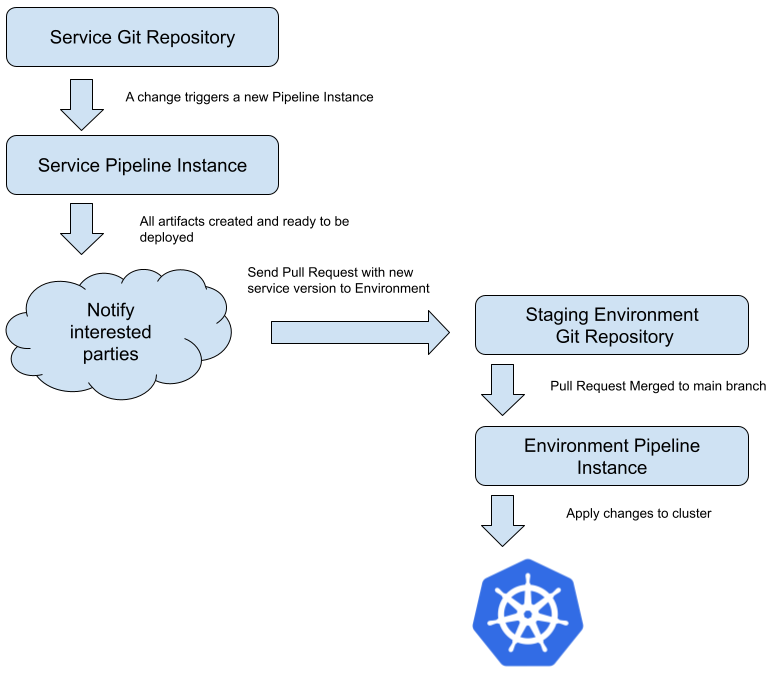
Figure 11: A Service Pipeline can trigger an Environment Pipeline via a Pull Request
The Service Pipeline, after all the artifacts were released and published, can send an automatic Pull Request to the Environment repository where the service needs to be updated or deployed triggering the Environment Pipeline. This simple but effective mechanism allows automated or a manual Pull Request to be sent every time that we want to upgrade or deploy something into our environments. For certain environments, such as staging or development environments, you can automate the merging of the Pull Request containing new services version enabling changes on the service repositories to be propagated automatically to these low-risk environments.
Enjoyed it? Get the book to read the rest!