

Contributed by @developer-guy, Batuhan Apaydin
Thanks to Priya Wadhwa for giving me the clue about the title of the blog post. Credit: www.youtube.com/watch?v=LzWkURgzkx0
There’s no doubt that in today’s world, software supply chain attacks are becoming an increasingly critical threat every day. I guess if they said you have three wishes for everyone in today’s Cloud Native ecosystem world, they would all answer those three rights as protecting my software supply chain. Therefore, instead of believing in fairy tales and instead of waiting for someone to come out and touch the magic wand to our CI/CD system to secure it against supply chain attacks, we should start taking precautions against these attacks without wasting any time from today to be a victim of these attacks and not to be included in the compromises list of cncf/tag-security.
This isn’t a problem that we can only solve alone. Assuming that 99% of today’s software uses open source technologies, we can say that this problem is a problem for all of us. Therefore, to solve this problem, we all must come together and embrace the problem we face, then, to defend ourselves against that risk, we should provide some good practices, recommendations, requirements, and tools. Just as we said, everyone in the Cloud Native ecosystem and the open source world took these attacks seriously and carried out important work on this issue. One of the results of these crucial works is the Tekton Chains project by the Tekton community, which we will talk about today.

If you don’t know where to start protecting your software supply chain against these attacks, Tekton Chains project is going to help you get off to a great start on this because it will make your software supply chain SLSA Level 2 compliant for free, please don’t worry if it doesn’t make sense to you, we will be talking about SLSA in the upcoming sections.
Before diving into the details of the Tekton Chains project, it would be better to mention the Tekton project; thus, you need to be using Tekton to be using the Tekton Chains project.
Tekton, known as Tekton Pipelines. Tekton is a CD Foundation project, under the Linux Foundation umbrella, and it is basically a CI/CD system built on top of Kubernetes. Actually, it is more than a CI/CD system, it is more like a framework because it lets you create your own CI/CD system by leverages CRD (Custom Resource Definitions) to give you the building blocks of the CI/CD you would typically expect, such as steps, tasks, pipelines, etc. The power of these building blocks allows you to create custom pipelines with various tasks such as running tests and quality checks, compiling the source code, building and scanning container images, etc.
Next, to better understand the benefit that we will get when we use the Tekton Chains project and the vision it sets for itself as a goal, we need to talk about the SLSA (Supply Chain Levels for Software Artifacts) project first.
In the most basic terms, SLSA is a security framework designed to help organizations improve the integrity of their software supply chains. SLSA is organized by levels, where each level represents incremental progress from the previous. The higher the level, the more confidence that the software process hasn’t been tampered with.
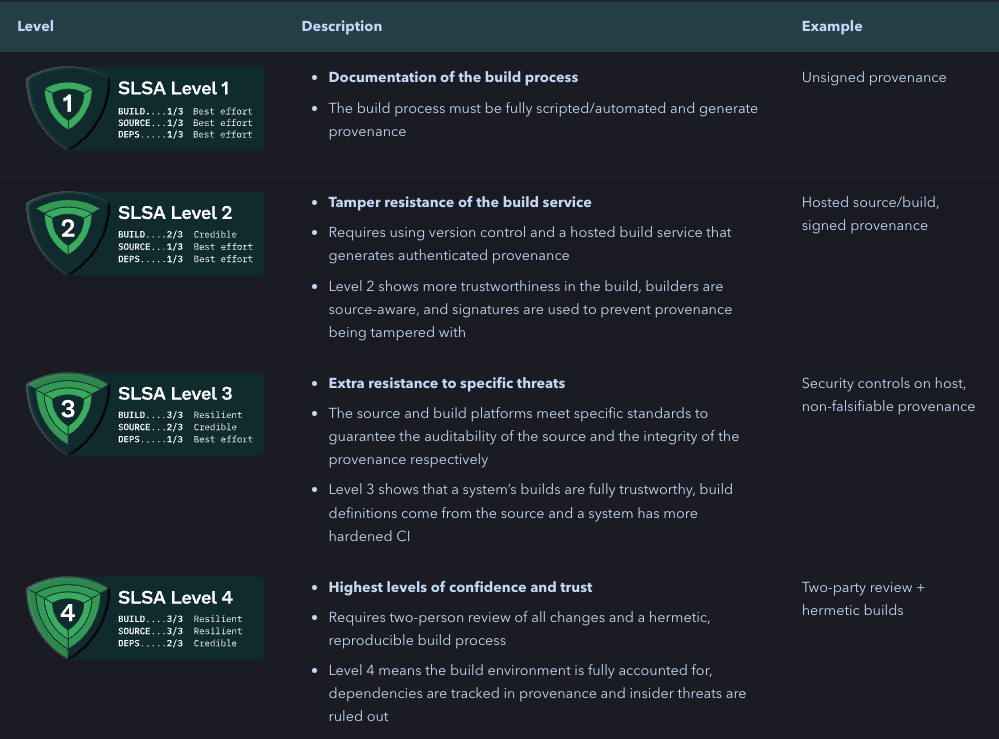
As we said, once you use Tekton Chains, your software supply chain will become SLSA Level 2 compliant due to provenance generation and make this provenance authentic by signing it.
But, wait a minute, what does provenance mean, why is it so important? One of the golden rules in software supply chain security is that every artifact can be verifiably traced to Source Code and Hardware because this might be the only proof that the software that you want to run on your systems is the software that is built by your trusted company. Therefore, you can think that you must ask questions about your artifacts before allowing them to run on production systems. I liken deploying artifacts to production systems to a job interview. Just like in the interview, just as the employer asks questions about the person to be hired for his suitability for the company, we should ask questions to understand whether the artifact is suitable for deployment in the production environment or not. For example:
- Who published this binary?
- How was it built?
- What version of tool <x> was used?
- What source was it built from?
- etc.
With provenance files, you can address these questions above. You can think of them as a proof document of your software, i.e. a record of prior ownership and a place of origin. Having this provenance offers several benefits. For one, it provides traceability for artifacts deployed in production, which significantly helps when debugging issues. Currently, provenance generation isn’t widely supported; again, thanks to Tekton Chains, as we mentioned above, Tekton Chains can create an attestation, a signed provenance, without any toil. But how?
TaskRuns are the main execution unit in Tekton Pipelines. Therefore, after the execution of a TaskRun, we can know:
- When the TaskRun completed
- What happened in the TaskRun, i.e., which source code was used, which steps were run, which parameters were used, which environment variables were set, etc.
- With the help of the results section, what artifacts were produced
So we can have all the information we need to generate a provenance file. Tekton Chains uses the information above and create a signed provenance for us based on various formats. While no standards exist for provenance data, in-toto, a CNCF project that provides a set of tools and specifications for software supply chain security, allows custom predicate types which can be used to represent provenance data. Therefore, one of the supported formats in Tekton Chains for the provenance data is in-toto.
Talk is enough! Let’s jump right into the demo.
Demo
In this demo, we’ll set up a CI/CD pipeline using Tekton or as known as Tekton Pipelines to build an OCI image by using kaniko Task from Tekton Hub. As we have installed Tekton Chains, once the TaskRun is completed, Tekton Chains will step in and take over the process of generating a signed provenance and signing the container image.
The talk is enough. Let’s jump right into the installation details.
Before diving into the installation steps, we have some prerequisites. First, we need a Kubernetes cluster up and running, to do that, we’ll use KinD. Tekton Chains works in a collaboration with Sigstore tooling, one of them is Cosign, which is a tool for container signing, verification and storage in an OCI registry.
To install Cosign, you can refer to the installation page, but if you are a macOS user, you can use the brew package manager for the installation:
brew install cosign
Let’s spin up our local development cluster with kind:
kind create cluster --image=kindest/node:v1.24.0
Next, let’s install Tekton. To do so, we can run the following command:
kubectl apply --filename https://storage.googleapis.com/tekton-releases/pipeline/latest/release.yaml
Check that all the pods are running before moving to the next steps:
$ kubectl get pods --namespace tekton-pipelines --watch
NAME                                           READY   STATUS    RESTARTS   AGE
tekton-pipelines-controller-79496856b6-7qxj2   1/1     Running   0          52s
tekton-pipelines-webhook-6cfcb89558-lhbx7      1/1     Running   0          52s
Once Tekton Pipeline is installed, the next step is to install Tekton Chains.
To install the latest version of Chains to your Kubernetes cluster, we can run the following command:
kubectl apply --filename https://storage.googleapis.com/tekton-releases/chains/latest/release.yaml
Again, check that all the pods are in a running step before moving to the next steps:
$ kubectl get pods -n tekton-chains --watch
NAME                                        READY   STATUS    RESTARTS   AGE
tekton-chains-controller-8589c4b778-m9q9f   1/1     Running   0          51s
Now, both Tekton Pipelines and Tekton Chains are up and running, we can continue with creating a public/private key pairs with Cosign that will be used by Tekton Chains and configuring the Tekton Chains based on our needs. Currently, the configuration of Tekton Chains is done via edits to the configmapin the tekton-chainsnamespace. You can get detailed information about the configuration options available in Tekton Chains, here but the main ones are the followings:
| Key | Description | Supported Values | Default |
|---|---|---|---|
| artifacts.taskrun.format | The format to store TaskRun payloads in. | tekton, in-toto | tekton |
| artifacts.taskrun.storage | The storage backend to store TaskRun signatures in. Multiple backends can be specified with comma-separated list (“tekton,oci”). To disable the TaskRun artifact input an empty string (“”). | tekton, oci, gcs, docdb, grafeas | tekton |
But, we will change the configmap to use in-totoformat and oci as the storage with the help of the following commands:
kubectl patch configmap chains-config -n tekton-chains -p='{"data":{"artifacts.taskrun.format": "in-toto"}}'
kubectl patch configmap chains-config -n tekton-chains -p='{"data":{"artifacts.taskrun.storage": "oci"}}'
Now, it is time to generate public/private key pairs with Cosign Tekton Chains will use that to sign the provenance and the container image. Tekton Chains expects a private key and password, if the key is encrypted, to exist in a Kubernetes secret signing-secrets in the tekton-chains namespace. Also, Tekton Chains supports a few different signature schemes, including x509 and KMS systems. To learn more about the other signing methods, you can refer to the signing artifacts page. But, in this guide, we’ll be using Cosign as a signing method.
Thanks to Cosign, which supports storing these types of public/private key pairs through different schemes. One of the schemes for generating key pairs supported in Cosign is Kubernetes Secret with the following prefix k8s:// , to do that run the simple command:
cosign generate-key-pair k8s://tekton-chains/signing-secrets
Cosign will prompt you for a password, and create the Kubernetes secret for you.
Now, everything is configured and properly up and running. Let’s move on with building the OCI image with the kaniko Task, to do that, we need to install kaniko Task first.
There are various ways of installing the Tekton Tasks. One method is directly going to the Tekton Hub via browser, finding the task, and copying the command under the Install the Task section and the second method, IMO a cooler one, is using the tkn CLI which is a CLI for interacting with Tekton and we’ll continue with that.
$ tkn hub search kaniko
NAME           KIND   CATALOG   DESCRIPTION
kaniko (0.6)   Task   Tekton    This Task builds a simple Dockerfile wi...

$ tkn hub get task kaniko --version 0.6 > kaniko.yaml
# ⚠️ do not forget to add the following to the steps section as a first step:
steps:
  - name: add-dockerfile
    workingDir: $(workspaces.source.path)
    image: bash
    script: |
      set -e
      echo "FROM alpine@sha256:69e70a79f2d41ab5d637de98c1e0b055206ba40a8145e7bddb55ccc04e13cf8f" | tee $(params.DOCKERFILE)

$ kubectl apply -f kaniko.yaml
task.tekton.dev/kaniko created

$ tkn task list --all-namespaces
NAMESPACE   NAME     DESCRIPTION              AGE
default     kaniko   This Task builds a ...   35 seconds ago
For the sake of simplicity and not to struggle with the authentication process, we’ll be using ttl.sh registry to publish our container image in kaniko Task. However, if you are using a private registry, you can follow up the documentation for setting up the authentication.
Now, let’s run that Task:
$ IMAGE_NAME=tekton-chains-demo
$ REGISTRY=ttl.sh
$ tkn task start --param IMAGE=$REGISTRY/$IMAGE_NAME --use-param-defaults --workspace name=source,emptyDir="" kaniko
TaskRun started: kaniko-run-qg4gd

In order to track the TaskRun progress run:
tkn taskrun logs kaniko-run-qg4gd -f -n default

$ tkn taskrun logs kaniko-run-qg4gd -f -n default
[add-dockerfile] FROM alpine@sha256:69e70a79f2d41ab5d637de98c1e0b055206ba40a8145e7bddb55ccc04e13cf8f

[build-and-push] INFO[0001] Retrieving image manifest alpine@sha256:69e70a79f2d41ab5d637de98c1e0b055206ba40a8145e7bddb55ccc04e13cf8f
[build-and-push] INFO[0001] Retrieving image alpine@sha256:69e70a79f2d41ab5d637de98c1e0b055206ba40a8145e7bddb55ccc04e13cf8f from registry index.docker.io
[build-and-push] INFO[0004] Built cross stage deps: map[]
[build-and-push] INFO[0004] Retrieving image manifest alpine@sha256:69e70a79f2d41ab5d637de98c1e0b055206ba40a8145e7bddb55ccc04e13cf8f
[build-and-push] INFO[0004] Returning cached image manifest
[build-and-push] INFO[0004] Executing 0 build triggers
[build-and-push] INFO[0004] Skipping unpacking as no commands require it.
[build-and-push] INFO[0004] Pushing image to ttl.sh/tekton-chains-demo
[build-and-push] INFO[0018] Pushed image to 1 destinations

[write-url] ttl.sh/tekton-chains-demo
Now, everything seems to work fine. Wait for a few seconds for Chains to do what it needs to do and then verify whether or not it worked. To do so, check the annotations of your TaskRun, and you should be able to see the chains.tekton.dev/signed=true annotation.
$ kubectl get tr kaniko-run-qg4gd -o json | jq -r .metadata.annotations
..
{
  "chains.tekton.dev/signed": "true",
  ...
}
At that point, you might be asking yourself how Tekton Chains knows which container image it needs to sign and that’s a question that really needs to be asked.
Tekton Chains expects the following two special results that have been set in the TaskRun to exactly know that which container images have been built by the TaskRun:
- *IMAGE_URL – The URL to the built OCI image
- *IMAGE_DIGEST – The Digest of the built OCI image
To get more detail about the process, you can reach out to the Chains Type Hinting page.
These results above have been added to kaniko in v0.6, see.
Let’s double-check whether the Tekton Chains worked by looking at the given image tags because Cosign must have created at least two additional tags for the given image, .att for the attestation and .sig for its signature. We can use crane tool to do that check.
craneis a tool for interacting with remote images and registries. You can refer to the installation page to install it on your environment.
$ crane ls $REGISTRY/$IMAGE_NAME
latest
sha256-4fc2b2ae92a2bf753c0ab478b01c5f71ca8d2a2cf9fb5435040e8c3b7df99daf.att
sha256-4fc2b2ae92a2bf753c0ab478b01c5f71ca8d2a2cf9fb5435040e8c3b7df99daf.sig
Everything seems correct, now, let’s move on to the verification step. The best way of proving Tekton Chains worked is by verifying the attestation and the signature of the given container image, to do that, let’s run the following commands:
To verify the signature:
$ cosign verify --key k8s://tekton-chains/signing-secrets $REGISTRY/$IMAGE_NAME | jq
Verification for ttl.sh/tekton-chains-demo:latest --
The following checks were performed on each of these signatures:
  - The cosign claims were validated
  - The signatures were verified against the specified public key
[
  {
    "critical": {
      "identity": {
        "docker-reference": "ttl.sh/tekton-chains-demo"
      },
      "image": {
        "docker-manifest-digest": "sha256:4fc2b2ae92a2bf753c0ab478b01c5f71ca8d2a2cf9fb5435040e8c3b7df99daf"
      },
      "type": "cosign container image signature"
    },
    "optional": null
  }
]
To verify the attestation:
$ cosign verify-attestation --key k8s://tekton-chains/signing-secrets --type slsaprovenance $REGISTRY/$IMAGE_NAME | jq
Verification for ttl.sh/tekton-chains-demo --
The following checks were performed on each of these signatures:
  - The cosign claims were validated
  - The signatures were verified against the specified public key
{
  "payloadType": "application/vnd.in-toto+json",
  "payload": "eyJfdHlwZSI6Imh0dHBzOi8vaW4tdG90by5pby9TdGF0ZW1lbnQvdjAuMSIsInByZWRpY2F0ZVR5cGUiOiJodHRwczovL3Nsc2EuZGV2L3Byb3ZlbmFuY2UvdjAuMiIsInN1YmplY3QiOlt7Im5hbWUiOiJ0dGwuc2gvdGVrdG9uLWNoYWlucy1kZW1vIiwiZGlnZXN0Ijp7InNoYTI1NiI6IjRmYzJiMmFlOTJhMmJmNzUzYzBhYjQ3OGIwMWM1ZjcxY2E4ZDJhMmNmOWZiNTQzNTA0MGU4YzNiN2RmOTlkYWYifX1dLCJwcmVkaWNhdGUiOnsiYnVpbGRlciI6eyJpZCI6Imh0dHBzOi8vdGVrdG9uLmRldi9jaGFpbnMvdjIifSwiYnVpbGRUeXBlIjoidGVrdG9uLmRldi92MWJldGExL1Rhc2tSdW4iLCJpbnZvY2F0aW9uIjp7ImNvbmZpZ1NvdXJjZSI6e30sInBhcmFtZXRlcnMiOnsiQlVJTERFUl9JTUFHRSI6Imdjci5pby9rYW5pa28tcHJvamVjdC9leGVjdXRvcjp2MS41LjFAc2hhMjU2OmM2MTY2NzE3ZjdmZTBiN2RhNDQ5MDhjOTg2MTM3ZWNmZWFiMjFmMzFlYzM5OTJmNmUxMjhmZmY4YTk0YmU4YTUiLCJDT05URVhUIjoiLi8iLCJET0NLRVJGSUxFIjoiLi9Eb2NrZXJmaWxlIiwiRVhUUkFfQVJHUyI6W10sIklNQUdFIjoidHRsLnNoL3Rla3Rvbi1jaGFpbnMtZGVtbyJ9fSwiYnVpbGRDb25maWciOnsic3RlcHMiOlt7ImVudHJ5UG9pbnQiOiJzZXQgLWVcbmVjaG8gXCJGUk9NIGFscGluZUBzaGEyNTY6NjllNzBhNzlmMmQ0MWFiNWQ2MzdkZTk4YzFlMGIwNTUyMDZiYTQwYTgxNDVlN2JkZGI1NWNjYzA0ZTEzY2Y4ZlwiIHwgdGVlIC4vRG9ja2VyZmlsZVxuIiwiYXJndW1lbnRzIjpudWxsLCJlbnZpcm9ubWVudCI6eyJjb250YWluZXIiOiJhZGQtZG9ja2VyZmlsZSIsImltYWdlIjoiZG9ja2VyLmlvL2xpYnJhcnkvYmFzaEBzaGEyNTY6ZThiMGJjZjdmZTg4ZWIwN2JjMThlNDQ4ZTMyOTY3M2JhMWUzODMzZGVhZDU1NWQxYjU2YzY5NDY2NzA2ZGUxOSJ9LCJhbm5vdGF0aW9ucyI6bnVsbH0seyJlbnRyeVBvaW50IjoiIiwiYXJndW1lbnRzIjpbIi0tZG9ja2VyZmlsZT0uL0RvY2tlcmZpbGUiLCItLWNvbnRleHQ9L3dvcmtzcGFjZS9zb3VyY2UvLi8iLCItLWRlc3RpbmF0aW9uPXR0bC5zaC90ZWt0b24tY2hhaW5zLWRlbW8iLCItLWRpZ2VzdC1maWxlPS90ZWt0b24vcmVzdWx0cy9JTUFHRV9ESUdFU1QiXSwiZW52aXJvbm1lbnQiOnsiY29udGFpbmVyIjoiYnVpbGQtYW5kLXB1c2giLCJpbWFnZSI6Imdjci5pby9rYW5pa28tcHJvamVjdC9leGVjdXRvckBzaGEyNTY6YzYxNjY3MTdmN2ZlMGI3ZGE0NDkwOGM5ODYxMzdlY2ZlYWIyMWYzMWVjMzk5MmY2ZTEyOGZmZjhhOTRiZThhNSJ9LCJhbm5vdGF0aW9ucyI6bnVsbH0seyJlbnRyeVBvaW50Ijoic2V0IC1lXG5pbWFnZT1cInR0bC5zaC90ZWt0b24tY2hhaW5zLWRlbW9cIlxuZWNobyAtbiBcIiR7aW1hZ2V9XCIgfCB0ZWUgXCIvdGVrdG9uL3Jlc3VsdHMvSU1BR0VfVVJMXCJcbiIsImFyZ3VtZW50cyI6bnVsbCwiZW52aXJvbm1lbnQiOnsiY29udGFpbmVyIjoid3JpdGUtdXJsIiwiaW1hZ2UiOiJkb2NrZXIuaW8vbGlicmFyeS9iYXNoQHNoYTI1NjpiMjA4MjE1YTQ2NTU1MzhiZTY1MmIyNzY5ZDgyZTU3NmJjNGQwYTJiYjEzMjE0NGMwNjBlZmM1YmU4YzNmNWQ2In0sImFubm90YXRpb25zIjpudWxsfV19LCJtZXRhZGF0YSI6eyJidWlsZFN0YXJ0ZWRPbiI6IjIwMjItMTAtMDNUMTE6MzI6NDdaIiwiYnVpbGRGaW5pc2hlZE9uIjoiMjAyMi0xMC0wM1QxMTozMzoxNVoiLCJjb21wbGV0ZW5lc3MiOnsicGFyYW1ldGVycyI6ZmFsc2UsImVudmlyb25tZW50IjpmYWxzZSwibWF0ZXJpYWxzIjpmYWxzZX0sInJlcHJvZHVjaWJsZSI6ZmFsc2V9fX0=",
  "signatures": [
    {
      "keyid": "SHA256:W/C1oJjm9+YGXQH2GzgvaaIEy8I2eSXN7919FgEiehU",
      "sig": "MEQCICuUwPTKAY2CWRfGPAZ8O1v5u3G7kd5TIGlvBEPC3r2JAiBoqiC5i3rpYSNV3HrJIpe11ianGWkr49jMYsZouWSaww=="
    }
  ]
}
You can pipe the command output to see the content of the attestation 👇 “jq -r ‘.payload | @base64d | fromjson’”
That’s it. Now, your supply chain meets at least SLSA Level 2 requirements, thanks to Tekton Chains.
Furthermore
Here are a few other questions: What if I lose my private key or that private key falls into bad hands? How should I share the public key with others to allow them to verify my software? This is where “Keyless Signing” comes into the picture. Keyless signing doesn’t mean there are no keys, just because we no longer need to manage these keys because Cosign will create these keys behind secret doors. You can find all the details related to the “Keyless Signing Mode” under the experimental features of the Tekton Chains.
Currently, this experimental feature only works on a GKE cluster with Workload Identity configured (Workload Identity is required for Chains to be able to request an identity token).
Now that we are at SLSA Level 2, what are our requirements on the way to SLSA Level 3? Can we achieve this with Tekton Chains too? What are the associated risks in Tekton Chains against non-falsifiable provenance?
Let’s discover.
One of the requirements for achieving SLSA Level 3 is non-falsifiable provenance. Non-falsifiable provenance means that provenance can’t be changed or falsifiable by users or user-controlled build services. That sounds nice! As you saw in the previous example, Tekton Chains relies on the TaskRun results without really questioning the fact that the result is the correct result, which means that one of the cluster administrators or any person that has enough permissions allowed to do that can change results as one desires and mislead Tekton Chains about the image that it needs to take care of.
This is where SPIFFE/SPIRE project comes into the picture. With the integration SPIFFE/SPIRE, Tekton can achieve this capability. SPIFFE/SPIRE provides Tekton with short-lived certificates (backed by workload attestation), that are used to sign build results and status updates (through the TaskRun object). You can reach out to the **TEP-0089: Non-falsifiable provenance support to get more detail about the integration of the SPIFFE/SPIRE projects with Tekton or watch this awesome talk: Road to SLSA3: Non-falsifiable Provenance in Tekton with SPIFFE/SPIRE by Parth Patel & Brandon Lum from Open Source Summit 2022.