

Contributed by Dan Lorenc | originally posted on medium.com
Or, how to deploy 25+ CVEs to prod in one command!
WARNING: This is very long. I tried to trim it down, but decided against splitting it. Showing all steps required and how long this took was the point of the exercise. I expect most people not to finish reading this, and that’s OK — I didn’t even finish analyzing everything. At least scroll to the bottom so you can see how much there is, and consider following me on Twitter for some bite-sized versions of archaeology like this.
When the first railroad train was built over Niagara Falls, engineers were faced with the challenge of getting the first cables across the river. The current was too strong and dangerous for a boat to traverse, and the winds were too strong to use the traditional method of firing an arrow. The engineers turned that wind to their advantage, and settled on a solution of flying kites across the river. Those initial kite strings were used to pull stronger cables across the river, which in turn were used to pull even stronger cables over the gap until the final suspension bridge could be built.
Most of today’s cloud infrastructure is still being built on duct tape and kite strings. There’s nothing inherently wrong with that, unless someone tries to drive a train across it. I’m particularly worried about this today in the area of open source supply-chain management. To identify and illustrate some of these gaps, I spent a day playing around with Helm 3 — “The package manager for Kubernetes.”
In this exercise, I installed a single Helm chart and then tried to reverse engineer exactly what software was installed, where it came from, and how it was built. I’m sharing this in the hopes of starting a conversation on how we can improve the security of packaging, containers, and cloud platforms in general. Not everything here is open source, container, Kubernetes, or even cloud specific. If you’re familiar at all with the recent SolarWinds incident, you’ll probably notice some common themes and areas for improvement here.
Getting Started
The Helm homepage pointed me over to the Artifact Hub, an open source project to help users find, discover and install Kubernetes packages. I didn’t really have any Charts in mind, so I clicked the browse all packages link and started with the first one: kube-prometheus-stack.
The UI indicated that this is an “Official” Package and that the publisher is “Verified”. I couldn’t really find any information on what those badges actually mean or what the criteria is to get them, but some searching did turn up a few GitHub issues where discussion seems to be ongoing.
I followed the installation instructions for this chart, which roughly consist of adding the “prometheus-community” chart repo to my local installation, updating it, and then installing the “kube-prometheus-stack” chart. This chart created a handful of Kubernetes objects in my cluster that roughly boil down to two distinct container images. I checked out the running pods using the command shown in the install output, with a little JSON parsing magic to filter out the container image names:
$ kubectl get pods -l “release=test” | jq -r
.items[].status.containerStatuses[].image

quay.io/prometheus-operator/prometheus-operator:v0.44.0
quay.io/prometheus/node-exporter:v1.0.1
Here’s what this all looks like so far:
Exploring the Node-Exporter
I started at the bottom with the node-exporter image: quay.io/prometheus/node-exporter:v1.0.1. My goal was to check the image for CVEs and find the source for the base image and any other binaries included in the final running container. This is all much easier said than done, and there’s a lot of trust/guesswork involved. Hopefully there are easier ways to accomplish this, but I’m not aware of any. Here’s how I proceeded.
Cracking Open the Image
Most registries allow you to just type an image URL into your browser to see some info about the image itself. This is Quay’s UI:
My installation is using the v1.0.1 tag, so I clicked on that to get some more info.
Unfortunately Quay’s built-in security scanner doesn’t seem to support this image. The only thing that really stood out to me here was that the image was six months old. The probability of there being some out-of-date packages in here seemed pretty high, so I kept digging to find out what was in here and if anything needed to be updated.
I tried out Snyk’s security scanner next by running it on the image, with no luck:
$ snyk container test quay.io/prometheus/node-exporter:v1.0.1

Testing quay.io/prometheus/node-exporter:v1.0.1…
✓ Tested quay.io/prometheus/node-exporter:v1.0.1 for known issues, no vulnerable paths found.

Note that we do not currently have vulnerability data for your image.
There’s a checkmark that seems good at first, but it’s followed by a little warning that says Snyk has no data for this image. I remained curious why these tools couldn’t inspect this image.
Next up, crane. This tool works at a lower level than things like the automated security scanners and Snyk, allowing you to look at the raw image configuration and layers — file-by-file and byte-by-byte. It requires some knowledge of container image internals to use, but I’ll explain each command as I go.
My first guess was that this is a tiny image, built FROM SCRATCH or something similar, designed to minimize the attack surface. This is a good practice, but sometimes can be taken a little too far by removing all of the metadata that tools need to understand the image contents. These images usually only have a few layers, so I checked the manifest first.
Manifest list output from crane.
This image is built for multiple platforms, so the URL actually refers to a manifest list. If you’re interested in more information on these concepts, you can refer to the OCI specifications. I needed to see the amd64 version, so I had to pull out that digest and then run crane manifest again with that:
$ crane manifest quay.io/prometheus/node-exporter@sha256:f5b6df287cc3a87e8feb00e3dbbfc630eb411ca6dc3f61abfefe623022fa6927 | jq .
{
  "schemaVersion": 2,
  "mediaType": "application/vnd.docker.distribution.manifest.v2+json",
  "config": {
    "mediaType": "application/vnd.docker.container.image.v1+json",
    "size": 3403,
    "digest": "sha256:0e0218889c33b5fbb9e158d45ff6193c7c145b4ce3ec348045626cfa09f8331d"
  },
  "layers": [
    {
      "mediaType": "application/vnd.docker.image.rootfs.diff.tar.gzip",
      "size": 2841392,
      "digest": "sha256:86fa074c6765dda1bcd90264d60cd541980e20eadeb0669031452c721a92f6b9"
    },
    {
      "mediaType": "application/vnd.docker.image.rootfs.diff.tar.gzip",
      "size": 536658,
      "digest": "sha256:ed1cd1c6cd7a382d8fabc8efa0f191ce6229151c1b45951d5fa882fdab0014cf"
    },
    {
      "mediaType": "application/vnd.docker.image.rootfs.diff.tar.gzip",
      "size": 9569918,
      "digest": "sha256:ff1bb132ce7ba2452bef4000e1a102a18041bd12b87e2be2d160ee2ca43f7adf"
    }
  ]
}
From here I could see this image only has three layers. If this was built FROM SCRATCH there would probably only be one or two layers, so my next guess was that this is from some kind of minimal image like busybox, alpine or distroless.
There’s another section inside images called the config. This sometimes contains useful information about how the image was built, so I checked that out next. This is very verbose and contains a lot of this is boilerplate not relevant here, so I won’t embed it directly. You can see the full output on GitHub if you’re interested.
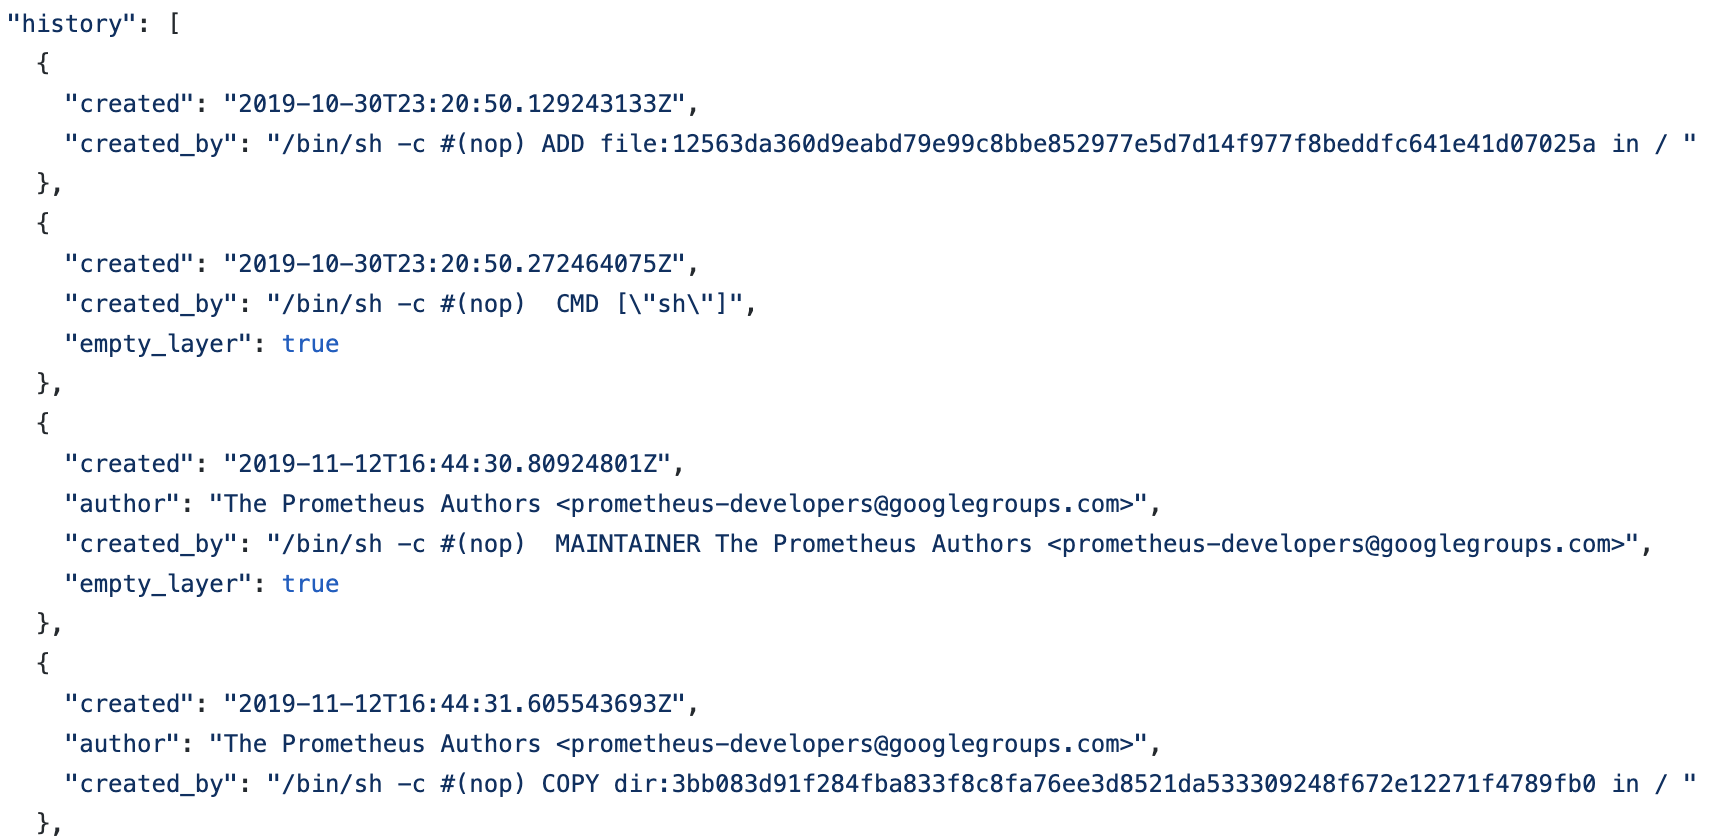
The one interesting section here is called history which some useful hints on how the image was built. It’s important to note that none of this info is verifiable — anyone can enter any data they want here. A quick glance at this section shows that this image started with a base image, set some metadata (MAINTAINER, ENTRYPOINT, etc.), exposed some ports, copied in some binaries, including one called /bin/node-exporter and set the USER to nobody (a great idea to do, instead of using root!). You can see a few of these entries here:
Base Image Hunting
My next step was to try to find the base image and what all the files copied in are. I decided to pull the container to see if I could find anything interesting as a starting point. I poked around a bit but couldn’t even figure out what Linux distro was used:
$ docker run -it — entrypoint=/bin/sh quay.io/prometheus/node-exporter:v1.0.1

/ $ cat /etc/os-release

cat: can’t open ‘/etc/os-release’: No such file or directory
At this point I decided to give up on the black box analysis. Nothing in the container was leading me to how it was built, or what packages were inside. I went to Google and GitHub to look for the source code. NOTE: there is no actual way to be sure that the container image I pulled and inspected was actually built from the source code on GitHub. You can either trust the maintainers, or try to build it yourself and compare each file. Docker images are not reproducible, so you will not be able to get the same sha256 even if the build is the same.
Through some links on the quay.io UI, I was able to find a link to the GitHub repo (same caveats around trusting this link apply here though…). From looking at the source, this looked like a Go binary, built with Go modules, packaged using a standard Dockerfile. I’ll come back to the Go stuff later, for now I was focused on the image itself.
This Dockerfile had some fancy ARG substitution in the FROM line, making it hard to directly find the base image:
FROM quay.io/prometheus/busybox-${OS}-${ARCH}:glibc
I was able to piece together the base image name from a few Makefiles and build scripts located nearby in the repo. Again, assuming these are the actual scripts and Dockerfiles used to build the image, it looked like the base image is also hosted on Quay: quay.io/prometheus/busybox-linux-amd64.
There’s no information about these images in the Quay UI, so I punched the name into Google and ended up at this GitHub repo: https://github.com/prometheus/busybox. It looked like this image was running the glibc flavor, so I opened up the corresponding Dockerfile and tried to figure out what was going on.
This Dockerfile is also parameterized, so you have to read the relevant scripts first to really understand what base images are being used. I think I was able to come up with a pretty good educated guess.
This is a complicated Dockerfile, so I’ll break it down into a few parts.
Starting at the top:
ARG ARCH=""
FROM ${ARCH}debian:buster-slim
RUN \
    apt-get update && apt-get install -y --no-install-recommends \
      ca-certificates \
      gcc \
      netbase \
    && rm -rf /var/lib/apt/lists/*
The FROM line indicates that we’re starting with an architecture-specific build of Debian buster. For amd64, it’s probably this one. A few standard packages are installed (ca-certs, a compiler, etc.) and then some unnecessary cruft is removed. Next up is a complicated shell script, that to be honest I have no idea how to read:
RUN set -x \
    && mkdir -p rootfs/lib \
    && set -- \
        /etc/nsswitch.conf \
        /etc/ssl/certs/ca-certificates.crt \
        /usr/share/zoneinfo \
        /etc/services \
        /lib/"$(gcc -print-multiarch)"/libpthread.so.* \
    && while [ "$#" -gt 0  ]; do \
        f="$1"; shift; \
        fn="$(basename "$f")"; \
        if [ -e "rootfs/lib/$fn" ]; then continue; fi; \
        if [ "${f#/lib/}" != "$f" ]; then \
            ln -vL "$f" "rootfs/lib/$fn"; \
        else \
            d="$(dirname $f)" \
            && mkdir -p "rootfs/${d#/}" \
            && cp -av "$f" "rootfs/${f#/}"; \
        fi; \
    done
There’s a loop, and a list of files. My rough guess is that we’re copying these over into a directory called /rootfs, which I really could only figure out because of the next part:
FROM        ${ARCH}busybox:glibc
MAINTAINER  The Prometheus Authors <prometheus-developers@googlegroups.com>
COPY --from=0 /rootfs /
Here, we start all over again with another FROM line! This is the second stage in the build. This stage throws away the filesystem from the first part and starts fresh with another architecture specific image, so the built executables can be copied in without the build tools. Guessing/googling leads me to believe it’s amd64/busybox, hosted on Dockerhub. Everything from that /rootfs directory then gets copied into the root directory.
So to summarize: this Dockerfile is basically a clever hack to add Debian’s glibc and ca-certs packages to a slimmer busybox image.
Stepping back up a level, I now had a pretty good idea of what was in the final prometheus/node-exporter image:
- A
busyboximage base from Dockerhub - A handful of files from Debian Buster packages (glibc, ca-certs, etc.)
- A binary called
node-exporter, built from some Go source code.
It’s no wonder Snyk and Quay.io can’t tell what packages are in here — the image isn’t really using any actual distro or package manager. It was purposefully built to strip out all of that metadata and combine parts of things from other package managers.
I was still a little curious about the glibc build. This is a complicated, important piece of software that often has serious vulnerabilities reported and fixed. The final image was six months old, so there was a chance that glibc was out of date. I wasn’t aware of any way to see what version of glibc was in here from the outside, so I ran the container and checked it directly:
$ docker run -it — entrypoint=/bin/sh quay.io/prometheus/node-exporter:v1.0.1

/ $ ./lib64/libc.so.6

GNU C Library (Debian GLIBC 2.28–10) stable release version 2.28.
Copyright © 2018 Free Software Foundation, Inc.
This is free software; see the source for copying conditions.
There is NO warranty; not even for MERCHANTABILITY or FITNESS FOR A PARTICULAR PURPOSE.

Compiled by GNU CC version 8.3.0.
libc ABIs: UNIQUE IFUNC ABSOLUTE
For bug reporting instructions, please see:<http://www.debian.org/Bugs/>.
I compared this against the Debian package manager, and saw that 2.28–10 was up to date (as of December 28th, when I checked), so it looked like the image was pretty good. As one final test, I checked the SHA of the binary against another debian:buster image, and got a match:
$ docker run -it debian:buster
# sha256sum /lib/x86_64-linux-gnu/libc.so.6
dedb887a5c49294ecd850d86728a0744c0e7ea780be8de2d4fc89f6948386937 /lib/x86_64-linux-gnu/libc.so.6

$ docker run -it — entrypoint=/bin/sh quay.io/prometheus/node-exporter:v1.0.1
$ sha256sum /lib/libc.so.6
dedb887a5c49294ecd850d86728a0744c0e7ea780be8de2d4fc89f6948386937 /lib/libc.so.
Popping the Stack — The Go Binary
Next up on the stack of things to look at is the node-exporter binary itself. There’s an actual release published on the GitHub repository for this project, with a pre-built binary.
The v1.0.1 release appeared to be the latest, which happens to match the container image my installation was running. So even though it was six months old, there were no updates to apply.
The first check I did was another SHA comparison. I downloaded the binary from the GitHub release and checked the SHA against the one in the container. We got a match!
$ shasum -a 256 node_exporter-1.0.1.linux-amd64/node_exporter

71bf890eb1a1ffd402d9351ab1201ae7cb2490085443d6f6c6c42b6aba53db16 node_exporter-1.0.1.linux-amd64/node_exporter

$ docker run -it — entrypoint=/bin/sh quay.io/prometheus/node-exporter:v1.0.1
/ $ sha256sum /bin/node_exporter

71bf890eb1a1ffd402d9351ab1201ae7cb2490085443d6f6c6c42b6aba53db16 /bin/node_exporter
Next up I decided to check out the included Go modules. I’m in the middle of another blog post series explaining how this packaging system works in detail, so I won’t get into that too much here. It’s possible for these dependencies to go out of date just like the system ones, so I cloned the repo at the v1.0.1 tag and ran snyk test again:
$ snyk test

✓ Tested 85 dependencies for known issues, no vulnerable paths found.
It found nothing! Great job! I ran the same set of checks on the prometheus-operator image and it was similarly constructed using the Debian/Busybox Franken-base and the Go modules were up to date.
Dependencies of Dependencies
So the base images and Go dependencies were all up to date. I was reasonably confident the binary came from the GitHub repository I scanned. I was reasonably sure I was able to track down everything in the base image itself, even though quite a bit of guesswork was involved. Does that mean we’re done here? Of course not!

The Helm chart itself comes with its own set of dependencies, which are other charts, which come with other container images, which are built with their own Dockerfiles and application code! This is where things started to get interesting. ArtifactHub shows these in the pane on the right:
And you can see them as running pods in your cluster, although they don’t get the Helm release label tag for some reason, so they can’t be easily queried. The easiest way I could find to see them all was that they had the same created time:
$ kubectl — namespace default get pods

foo-grafana-7b4f4df69b-29lmb 2/2 Running 0 9h
foo-kube-prometheus-stack-operator-6d4ff5c755-cqzx9 1/1 Running 0 9h
foo-kube-state-metrics-5d5b9974bb-9ln9x 1/1 Running 0 9h
foo-prometheus-node-exporter-8qzsr 1/1 Running 0 9h
foo-prometheus-node-exporter-kbk5l 1/1 Running 0 9h
Recursive Descent Into Madness
I started at the top with one of the dependencies, grafana. Using similar JSON parsing from earlier, I saw two running containers, both hosted on Dockerhub:
$ kubectl get pods foo-grafana-7b4f4df69b-29lmb -o=json | jq .status.containerStatuses[].image

“grafana/grafana:7.2.1”
“kiwigrid/k8s-sidecar:1.1.0”
I started with grafana/grafana. Snyk lit up here:
This image had three out of date packages with some relatively severe CVEs present. I hopped over to the grafana Dockerhub page, looking for a more recent tagged version. It looked like the latest was 7.3.6, which had fixed the HIGH sev vulnerability but not the two MEDIUMs. I checked against the master tag as well, and that had everything up to date. So, given enough time these fixes should make it all the way up to the Chart I was trying to test, but who knows what else would go out of date by then?
I think it’s possible to switch the image used in a Helm chart to something more recent, but I’m not actually sure how. Since this was a chart dependency, there might also be a more recent version of the Grafana chart itself, but again I’m not sure how to tell or how to force the top-level chart to use a different version.
Next up, I decided to check out the Grafana codebase itself. I cloned it and ran snyk test. 12 issues, total, 7 of which have no upgrade path!
I noticed that these were all in the Grafana frontend, using the yarn dependency manager. Grafana also has a backend written in Go, so I checked that too:
https://gist.github.com/dlorenc/f1593353ad4842c12766fb8d04f4a3d4
Seven more issues, for a total of 19 in Grafana alone. Interestingly, five of the seven in the Go scan were actually in Grafana itself. Snyk was able to find Grafana CVEs in the Grafana GitHub repo, but not in the Grafana container image! This is because Grafana is not installed via a package manager in the published container images, it is built directly into the image via a Dockerfile. Snyk has no way of knowing Grafana binaries are in there. If you think your container scanning setup is catching everything, think again!
This got me curious, so I poked around at the image one more time to see where the binary was and to try to figure out if the version I had was actually vulnerable to the reported Grafana CVEs. Snyk’s output indicated that some of them were pretty old. I ran the image, found the binary and checked the version:
$ docker run -it — entrypoint=/bin/sh grafana/grafana:7.2.1
$ ls bin
grafana-cli         grafana-cli.md5     grafana-server      grafana-server.md
$ bin/grafana-server -v

Version 7.2.1 (commit: 72a6c64532, branch: HEAD)
This binary told me what commit and version it was built from. I also noticed that there was an md5sum file sitting next to the binary in the image. This seemed strange, what value would this add? Anyone that could change the binary could just change the md5sum next to it. Anyway, I checked and it matched.
Next I looked for something outside the image to compare that md5sum against. Grafana doesn’t host releases on GitHub, but there’s a link to a download page for each release. The commit shown in the GitHub UI for 7.2.1 matched the one shown in the version command output, so that was a good start. Unfortunately, here is where things got worse. They publish a sha256 on their downloads page, next to the archives:
But this applies to the archive itself, not the binary in the container image. I downloaded the archive and opened it up. There’s another md5sum and binary in here, but they don’t match the ones in the container:
$ curl -LO https://dl.grafana.com/oss/release/grafana-7.2.1.linux-amd64.tar.gz
$ tar -xf grafana-7.2.1.linux-amd64.tar.gz
$ cat grafana-7.2.1/bin/grafana-server.md5
aafc8b0ef1e381cfe553a650550280e8
Vs:
$ docker run -it — entrypoint=/bin/bash grafana/grafana:7.2.1
$ cat bin/grafana-server.md5
3ad09294d69589cd1863bf24c0254760
This was a little surprising, but not terrifying. The container was built with a Dockerfile that compiles the Go binary as part of the build process. There is also a Makefile that lives next to the Dockerfile in the repo that contains another target to build just the binary and release archive. Go builds are generally reproducible, but there are some caveats: the GOPATH/GOROOT must be identical, the Go version has to match, and things get tougher with CGO, which appears to be in use here.
My friend Jon Johnson helped me dig a little bit further, and showed me some tricks to compare Go binaries. Using the file command I could see that the published binary was built with dynamic linking, but the one in the container was built statically:
$ file grafana-7.2.1/bin/grafana-server

grafana-7.2.1/bin/grafana-server: ELF 64-bit LSB executable, x86–64, version 1 (SYSV), dynamically linked, interpreter /lib64/ld-linux-x86–64.so.2, for GNU/Linux 2.6.32, Go BuildID=Yn5GAE3B5AX_5SjK1n3p/LzeGW9PoYU7a0SJeU9H7/K2WEuV9Pl0f3MSniaquf/ayZoG0rQLP56febfkH5S, not stripped

$ file dockerhub/grafana-server

dockerhub/grafana-server: ELF 64-bit LSB executable, x86–64, version 1 (SYSV), statically linked, Go BuildID=bo6idB73OCb_FrJl4Dzd/LzeGW9PoYU7a0SJeU9H7/K2WEuV9Pl0f3MSniaquf/mpOMldBFieLKb2kvZGNz, not stripped
This seemed a little backwards, but the Dockerfile/Makefile checked out and showed that this is intended for some reason.
I tried to build the Docker image directly from the repo at that commit and got an entirely different md5. I repeated the process and got another one. So it looks like the build process here is just not reproducible. I would be much more worried if it were reproducible and I couldn’t reproduce it, but there isn’t much to be happy about here. We’re left trusting that the binary in this container was actually built from the source in the repo, with no way to actually be sure.
Once More, For Good Measure
There was one other container that showed up running in my cluster, the sidecar: kiwigrid/k8s-sidecar:1.1.0. This seemed a little strange so I took a deeper look. Synk showed basically the same MEDIUM/HIGH Alpine CVEs that the grafana container had:
https://snyk.io/vuln/SNYK-ALPINE312-OPENSSL-1050745, https://snyk.io/vuln/SNYK-ALPINE312-MUSL-104276 https://snyk.io/vuln/SNYK-ALPINE312-KRB5-1043934.
Not a good sign. I still didn’t understand what this sidecar was for, so I hopped over to the repo to look. I keep repeating this, but again there is no actual way to be sure this repo is used to build the container. I’m just trusting the publishers. Further, you can’t even be sure that the publishers on Dockerhub are the same people that own the GitHub repo — this could be classic NameSquatting. From reading the documentation, it looked like this sidecar helps watch ConfigMaps and restart other containers in the pod.
The Dockerfile is Alpine-based (which matched the Snyk results), and includes a build of Python 3.7. I decided to check out the Python dependencies for CVEs as well, since I noticed in the Grafana case that these can be missed when you just look at the container itself. I cloned the repo and tried to run snyk again.
This started to get messy because Python dependency management is hard to reason about. Projects typically commit a requirements.txt file to indicate dependencies, but these do not necessarily contain all the transitive dependencies. In this case, kiwigrid/k8s-sidecar only declared two top-level dependencies:
kubernetes==12.0.0
requests==2.24.0
Snyk noticed that this was not fully resolved, and let me know right away with an error message:
$ snyk test

Required packages missing: kubernetes, requests
Please run `pip install -r requirements.txt`. If the issue persists try again with — skip-unresolved.
I had to actually install this package to see the full set of requirements it used. To further complicate things, installing a Python package allows dependencies to execute arbitrary code on your machine as part of the setup process. For a detailed look at what can go wrong here, see Jordan Wright’s excellent analysis of hunting malware on PyPI.
I crossed my fingers and gave it a try anyway. After setting up Python 3, pip3 and reading up on how to create a virtual environment, I was able to get the fully resolved list of dependencies:
cachetools==4.2.0
certifi==2020.12.5
chardet==3.0.4
google-auth==1.24.0
idna==2.10
kubernetes==12.0.0
oauthlib==3.1.0
pyasn1==0.4.8
pyasn1-modules==0.2.8
python-dateutil==2.8.1
PyYAML==5.3.1
requests==2.24.0
requests-oauthlib==1.3.0
rsa==4.6
six==1.15.0
urllib3==1.26.2
websocket-client==0.57.0
Snyk was now happy, but I was not:
$ snyk test

Tested 18 dependencies for known issues, found 2 issues, 5 vulnerable paths.

Issues with no direct upgrade or patch:

✗ Arbitrary Code Execution [High Severity][https://snyk.io/vuln/SNYK-PYTHON-PYYAML-590151] in pyyaml@5.3.1

introduced by pyyaml@5.3.1 and 1 other path(s)

No upgrade or patch available

✗ Timing Attack [High Severity][https://snyk.io/vuln/SNYK-PYTHON-RSA-1038401] in rsa@4.6

introduced by rsa@4.6 and 2 other path(s)

No upgrade or patch available
There was an RCE and crypto vulnerability in this little sidecar with no upgrade path available. I found a little discussion on GitHub, but had no idea on how to tell if these issues mattered for this use case.
Final Thoughts
After several hours of jumping between ArtifactHub, GitHub, DockerHub, Quay and my terminal, I decided to finish up this experiment. This section contains some final thoughts and hopefully some good news!
Summary
For anyone keeping score at home, I found a grand total of 25 vulnerabilities that ranged from arbitrary remote code execution to issues in openssl and RSA cryptography libraries. I have no idea if any of these are actually exploitable in this or configuration. I wouldn’t feel very comfortable moving to production without a better understanding here.
I encourage you to re-read this with an adversarial hat on and think of all the ways you can break or attack these systems. The point of this exercise was not to “pick on” or criticize any of the projects or maintainers here, this is the state of the entire ecosystem. I was merely intending to show some of the things you might want to look out for when evaluating packages like this for use in your systems, and some techniques to do so. The methods here are arcane, verbose and time-consuming. This overall process took me several hours and I didn’t even finish looking through the containers and charts dependencies. I can’t imagine needing to personally do this for everything running in a production environment, but I also can’t imagine just closing my eyes and hoping for the best.
Package Managers
Each package manager adds a layer of convenience. You don’t need to build binaries from source — you can just use apt! You don’t need to write every library you want to use from scratch- you can just use Go modules! You don’t need to build container images from source — you can just use DockerHub or Quay! You don’t need to craft Pod specs from scratch — you can just use Helm/ArtifactHub!
But each layer here adds an element of required trust. You’re implicitly trusting the maintainers of every single one of these packages. Communities like Debian have carefully crafted policies for maintainers to follow and have invested YEARS of effort in reproducible build environments and packaging security. They can react to reported CVEs during the embargo period and get fixes released before you even know the vulnerability exists in many cases.
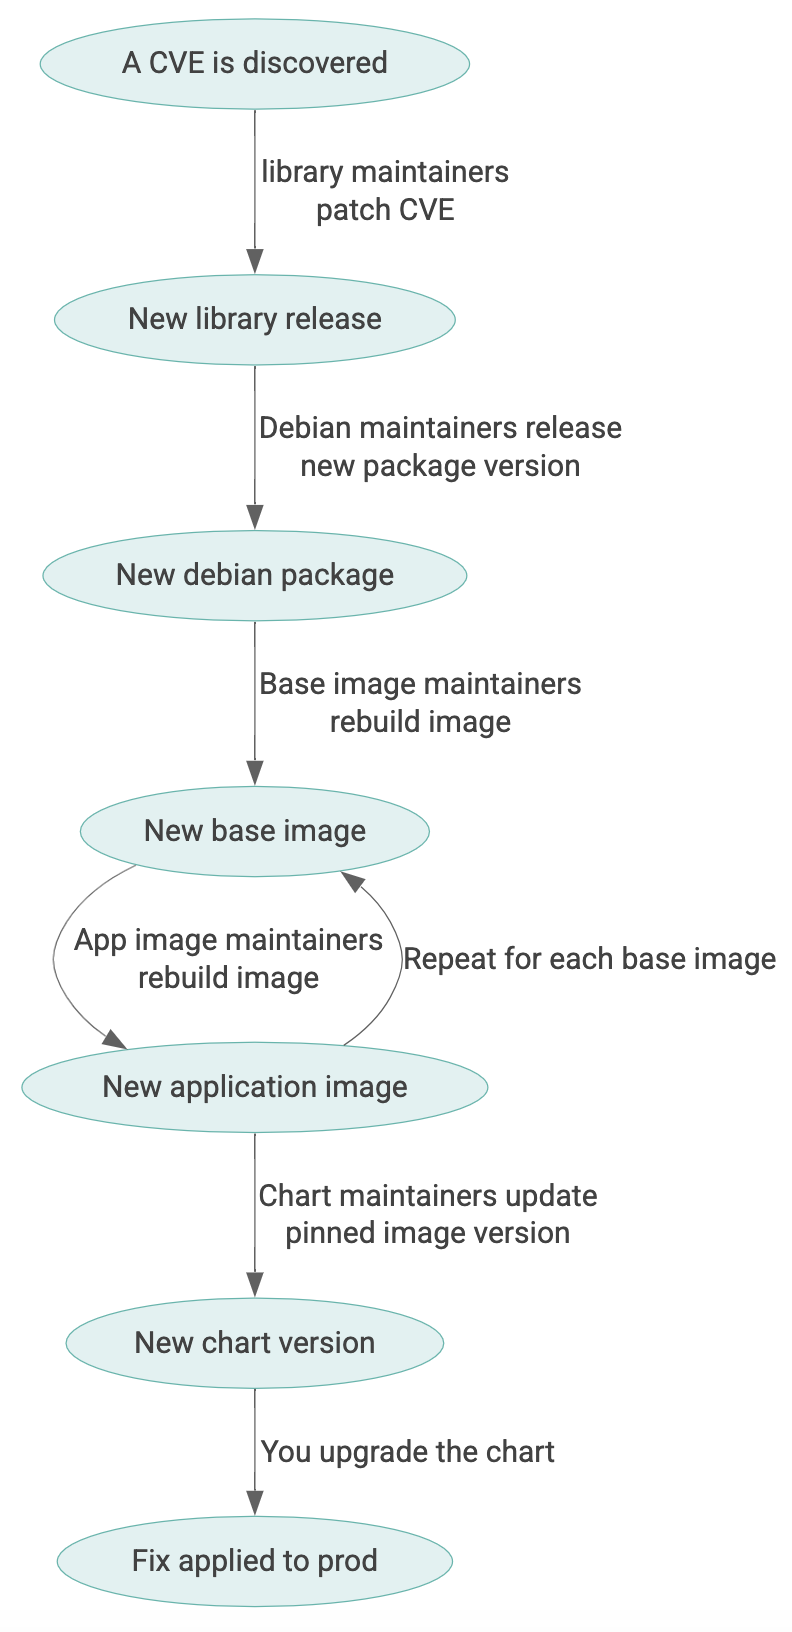
Even if every package you use in a high-level system like Helm has responsible maintainers actively monitoring reported CVEs and applying patches under a tight SLO, these SLOs add up with every layer of indirection. A CVE in a Debian package needs to be fixed at the source, rebuilt and published into the Debian repositories, rebuilt into the base images, rebuilt into the application images, and updated into the Helm charts before it can make it to your cluster. Each of these steps is done by a different set of maintainers. This could take weeks or months.
Good News
The good news is that I’m not the only one scared of all of this. As an industry we’re finally starting to take all of this seriously. I’m currently working with a great group of others in the new Open Source Security Foundation on all of these topics and more. Please reach out if you’re interested in helping fix any of this! We have a Slack channel, several email lists and a GitHub organization. I’d also be more than happy to help you get involved if you don’t know where to start. Feel free to contact me directly via email or Twitter.
Thanks to Jon Johnson and Kim Lewandowski for reviewing drafts of this and helping debug.