

Uh… Why is this month’s AWS bill so high?
Originally posted on the relay-sh blog, by Kenaz Kwa, Principal Product Manager @puppetize

Forgotten AWS EC2 instances have made everyone’s pockets hurt (including Puppet!). Take it from us (relay.sh team) — if you don’t proactively clean up unused EC2 instances, cloud spending can quickly get out of control. However, it can be tedious to routinely check which EC2 instances are still in use, track down the old ones, and remove them. Luckily — we know how to automate these tasks!
Our mission is to free you to do what robots can’t.
This post walks you through de-provisioning unused EC2 instances by using AWS Lambda and CloudFormation to deploy an EC2 reaper that uses simple Tags to cut down on spending.
To see the full code, check out this repo.
AWS EC2 Reaper overview
The AWS Reaper works by checking and enforcing tags that are set on the EC2 instances. All EC2 instances must be tagged with a lifetime or a termination_date. The termination_date defines a future date after which the EC2 instance will be terminated. Alternatively, the Reaper looks for a lifetime tag– if found, it calculates a new future date and adds that date as the termination_date tag for the EC2 instance.
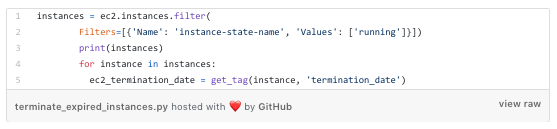
First, let’s look at the reaper.py. The main reaper logic for handling instances is in the terminate_expired_instances function which lists instances and looks up the termination date tag for each instance:
Improperly Tagged Instances
If we find an instance that doesn’t have a termination_dateor we find the tag can’t be parsed, we stop it:
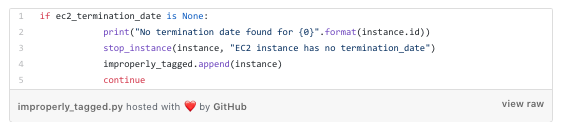
This enables us to stop the b̶l̶e̶e̶d̶i̶n̶g̶ billing while we contact the instance owner to see if it should still be kept around.
Expired Instances
For all instances we find that are expired, we destroy:

Deploying the EC2 reaper
Now, we could just run this python script against different AWS regions and we’d already be better off than doing this manually. However, we would rather not spend time babysitting scripts at all. We’re going to deploy this into AWS using CloudFormation Stacks.
Deploying the AWS reaper has two parts:
deploy_to_s3.yamlAWS CloudFormation template that places the lambda zip resources in S3 buckets in every region so that thedeploy_reapertemplate can read them for Reaper deployment.deploy_reaper.yamlAWS CloudFormation template that installs the reaper creates the IAM role and deploys the lambda function to perform the instance reaping.
deploy_to_s3 template
In order to use this template, you must first manually create an S3 bucket that contains the resources to copy across all regions. You will need to do this once per region; S3 resources can be read between accounts but not between regions for AWS Lambda. This only needs to be done one time for the administrative account.
- Manually create an S3 bucket accessible from the administrative account. Zip up the two python reaper files,
reaper.pyandslack_notifier.pyand place them in the bucket, naming themreaper.zipandslack_notifier.zip. - From the administrative account, create a new stack set and use the
deploy_to_s3template. An example CLI invocation would look like:
$ aws cloudformation create-stack-set --stack-set-name reaper-assets --template-body
file://path/to/deploy_to_s3.yaml --capabilities CAPABILITY_IAM --parameters
ParameterKey=OriginalS3Bucket,ParameterValue=reaperfiles
- Deploy stack-set-instances for this stack set, one per region in the administrative account. Check the Amazon documentation for the most up-to-date region list. For example:
$ aws cloudformation create-stack-instances --stack-set-name --accounts 123456789012
--regions "us-west-1" "us-west-2" "eu-west-1" ...
deploy_reaper template
After the resources for the reaper have been distributed, you can use the deploy_reaper CloudFormation template to deploy the reaper into an account.
You will need to follow the steps below for each account you are deploying the reaper into.
- First, create a stack set representing the account you wish to run the reaper in. Example invocation:
$ aws cloudformation create-stack-set --stack-set-name reaper-aws-account --template-body
file://path/to/deploy_reaper.yaml --capabilities CAPABILITY_IAM --parameters
ParameterKey=SLACKWEBHOOK,ParameterValue=1234567 ...
- Deploy the reaper into the account.
$ aws cloudformation create-stack-instances --stack-set-name reaper-aws-account --accounts
098765432109 --regions "us-west-1" "us-west-2" "eu-west-1" ...
Turning on the EC2 Reaper
Once deployed, the EC2 Reaper will not reap anything unless the environment variable LIVEMODE is set to TRUE. It will only report what it would have done to Slack.
When the time comes to activate the Reaper, update the parameter value LIVEMODE to “TRUE”(the regex is case-insensitive).
$ aws cloudformation update-stack-set --stack-set-name reaper-aws-account
--use-previous-template --parameters ParameterKey=LIVEMODE,ParameterValue=TRUE --capabilities CAPABILITY_IAM
Conclusion
Now you have learned how to control costs on AWS by reaping old EC2 instances. To learn more about our mission and product, sign up for our updates on relay.sh. Our mission is to free you of tedious cloud-native workflows with event-driven automation! For more content like this, please follow our medium page at https://medium.com/relay-sh.